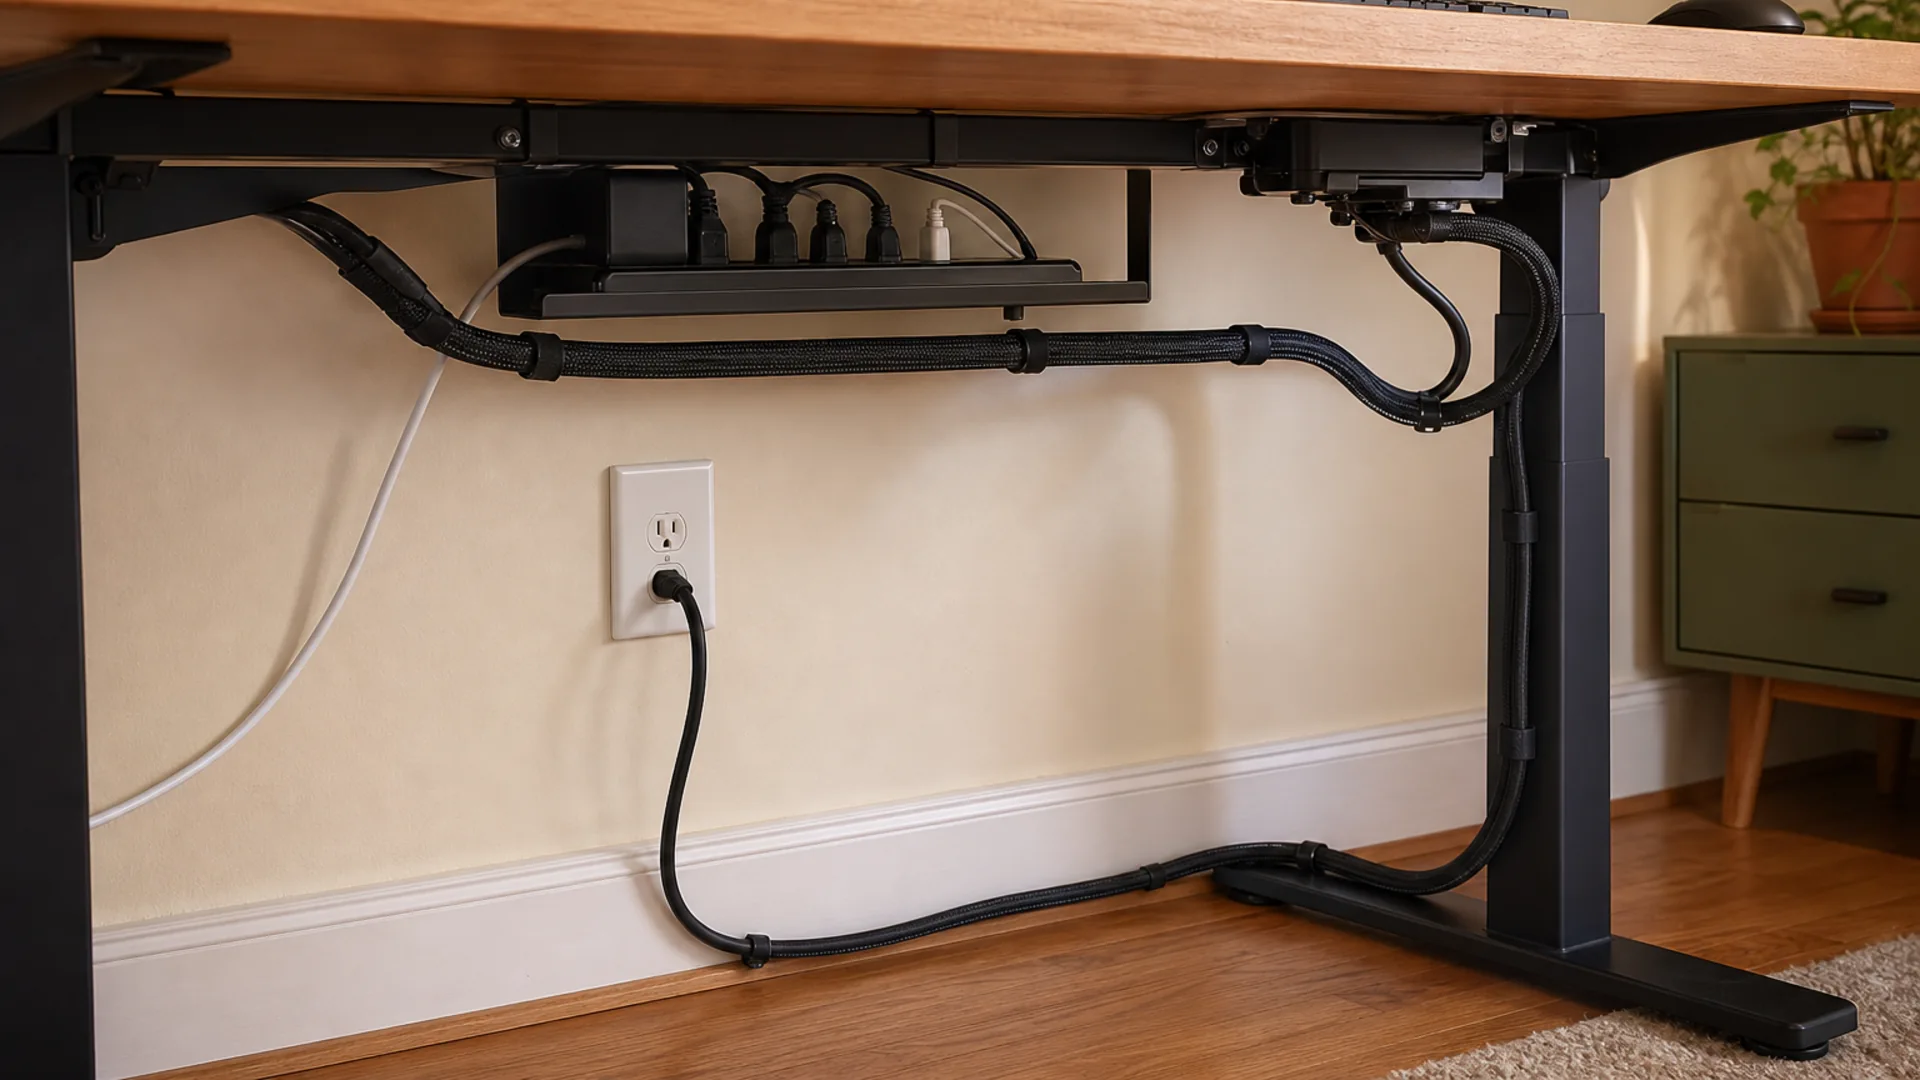
A practical reading of cable management solutions
Create one main path before branching to individual devices.
Adjustable desks need a safe loop at every moving boundary.
Some links in this guide are affiliate links. If you buy something through them, we may earn a small commission at no extra cost to you. We only recommend products we've thoroughly researched and genuinely believe in.
Let's be honest — nobody plans for cable spaghetti. You set up your monitor, plug in your laptop, add a desk lamp, phone charger, maybe a second monitor, and before you know it, there's a knotted mess under your desk that looks like a prop from a sci-fi movie.
Cable management is one of those things you ignore until you can't anymore. Then one day you trip on a dangling cord, or you're on a video call and someone spots the nest behind your monitor, and you think: I need to fix this.
Good news: you don't need a pro organizer or a fat wallet. The right combo of cheap clips, a decent cable tray, and a little patience will make your desk look cleaner and work better. This guide covers everything — the $10 fixes, the pro-tier solutions, the DIY hacks, and the exact order to do it all in.
Why Cable Management Actually Matters
It's easy to write off cable management as an aesthetic thing — something for Instagram workspaces and people with too much time. But there are real, practical reasons to clean up your cables.
Safety First
Dust builds up on cables, especially behind desks where nobody vacuums. That's a problem because dust is flammable, and cables — especially power bricks and extension cords — generate heat. A dense pile of tangled cords traps heat and provides fuel. Cable-related fires are rare, but they're not unheard of. The National Fire Protection Association reports that electrical distribution equipment (which includes cords and power strips) was involved in roughly 6% of home structure fires between 2015 and 2019. Keeping your cables separated and dust-free isn't paranoia — it's basic fire prevention.
There's also the tripping hazard. A cable stretched across a walkway or dangling low enough to catch your foot is an accident waiting to happen. If you work in an office with other people — or have kids or pets at home — loose cables on the floor are a genuine liability.
Airflow and Heat
Your computer, monitor, and chargers all generate heat. When cables are bunched together, they trap heat against each other and against your desk surface. That heat degrades cable insulation over time, especially on cheap charging cables that already have thin shielding. Keeping cables separated and elevated improves airflow and extends the life of your gear.
The Mental Clarity Angle
This one sounds a little woo-woo, but it's real. Visual clutter competes for your attention whether you realize it or not. Researchers at Princeton found that physical clutter reduces your brain's ability to focus and process information. Every dangling cable you can see is a tiny mental distraction — your peripheral vision picks it up, your brain registers it as "something to maybe deal with," and that uses a sliver of cognitive bandwidth. Clean that up, and you get a small but measurable improvement in focus.
Plus, a clean desk just feels better to sit down at. You're less likely to put off work when your workspace doesn't remind you of a cluttered service closet.
Easier Maintenance and Upgrades
When every cable is labeled and routed cleanly, swapping a monitor or adding a new device takes five minutes instead of untangling a mess and tracing wires. Good cable management is an investment in your future self's patience.
The $10 Fix: Zip Ties, Cable Clips, and Adhesive Mounts
If your budget is "basically zero," you can still make a massive improvement. These are the cheapest tools in your cable management arsenal, and they're surprisingly effective on their own.
Zip Ties (aka Cable Ties)
A bag of 100 zip ties costs about $5 on Amazon. They're the single most useful cable management tool you can buy. Use them to bundle cables that run in the same direction — for example, bundle your monitor's power cable and video cable together so they act as one thick wire instead of two floppy ones.
One tip: don't cinch them too tight. Cables need a little slack to avoid putting stress on the connectors. And use releasable zip ties if you think you'll ever need to add or remove a cable. The kind with a little tab you can press to release — they cost a dollar more but save a lot of snipping.
Cable Clips
These are small plastic or metal clips with adhesive backing that stick to your desk edge or wall. You route a cable through the clip, and it holds the cable flush against the surface. A pack of ten costs about $6.
Where to put them:
- Under the front lip of your desk — catch the cables before they drop
- Along the back edge of your desk — route cables from monitor to the back
- On the side of your desk leg — run a cable down the leg instead of dangling
Adhesive Cable Mounts
These are slightly larger versions of cable clips — they have a wider base and a stronger adhesive pad. Use them for heavier cables like power bricks or thick USB-C cables that normal clips can't hold. A four-pack runs about $8.
The total for a basic setup: About $10 for a bag of zip ties and a pack of cable clips. That's enough to make a visible difference in 20 minutes.
Under-Desk Cable Trays and Channels
Clips and ties will clean up the visible cables, but they won't hide the power strip, the wall warts (those bulky power adapters), and the long runs of cable that disappear under your desk. That's where an under-desk cable tray comes in.
A cable tray is a metal or plastic basket that screws or clamps to the underside of your desk. You put your power strip and excess cable length inside the tray. The result: nothing hangs below the desk-level threshold. From a seated position, you see clean desk legs and a floor with no cables.
What to Look for in a Cable Tray
- Size. Make sure it's long enough to hold your power strip plus the cable slack from your monitor and computer. A 17-inch tray is the sweet spot for most desks.
- Mounting. Some trays screw in (more secure), some clamp on (no tools, no holes). If you rent or can't drill, go with a clamp-on or adhesive-mounted tray.
- Material. Steel with a powder-coated finish is best. Plastic is cheaper but can sag over time, especially with heavy power bricks.
The most popular option at the budget end is the VIVO Under-Desk Cable Tray (steel, 17 inches, mounting screws included, about $17). It's the one you'll see recommended in every Reddit thread and Wirecutter-style roundup, and for good reason: it's simple, it works, and it doesn't fall off.
Cable Channels (for Desks Without Trays)
If you don't want a full tray and just need to route cables horizontally along the back of your desk, adhesive cable channels are a good middle ground. They're U-shaped plastic channels with adhesive backing — you stick them to the underside of your desk, run the cables through, and snap the cover on. A J Channel Cord Cover Raceway (three 12-inch sections, about $15) gives you 36 inches of hidden routing space.
Cable Sleeves and Raceways
Sleeves and raceways solve a different problem — the visible runs of cable between your desk and the wall. A cable tray hides what's under the desk, but if your desk sits away from the wall, you still have cables snaking across the floor or climbing up the wall.
Cable Sleeves
A cable sleeve is a fabric tube with a zipper or Velcro closure. You bundle multiple cables inside it, zip it shut, and now you have one clean "line" instead of five separate cables crawling across your floor.
The Eveo Cable Management Sleeve (about $13) is the one I see recommended most often. It comes in a couple of lengths (often 20 or 30 inches), has a YKK zipper, and the fabric is thick enough to hide the bumps of individual cables. You can route it from the back of your desk down to the floor and along the baseboard to your outlet.
Where sleeves shine:
- From desk to floor — bundle everything into one sleeve and run it down a desk leg
- Along baseboards — sleeve hides the mess against the wall
- Behind a TV or monitor stand — keep the cords from the wall outlet to the screen
Raceways
Raceways are rigid plastic channels that mount to your wall (adhesive or screw-in). They're ideal for permanent routes — like running cables from your desk to a wall outlet or along a baseboard. The cover snaps on and off, so you can still access the cables when you need to.
Most raceway kits come in 3-to-6-foot sections and cost between $10 and $25. A J Channel Cord Cover Raceway (Amazon, ~$15 for three 12-inch pieces) with adhesive backing is a common choice for wall runs. You can paint over them to match your wall color — just use a water-based paint that won't soften the plastic.
Cable Management for Standing Desks
Standing desks add a whole new layer of complexity because your cables move. Every time the desk goes up or down, the cables need to flex, extend, and retract without snagging on anything. A static cable management setup will fail on a standing desk — cables will get yanked, connectors will break, and you'll eventually hear that horrible pop of a port snapping.
The Cable Loop Strategy
The standard approach for standing desks is the service loop. You bundle the cables into a loop that hangs below the desk, and that loop provides the slack that pays out when the desk rises and retracts when it lowers.
Here's how to do it:
- Mount your cable tray to the underside of the desk itself (not the legs or the wall). The tray moves with the desk.
- Route all cables into the tray. Leave enough slack so when the desk is at its maximum height, nothing is taut.
- Gather the excess cable below the tray into a loose service loop. Use a Velcro strap to hold the loop together — don't use zip ties here, because you'll want to adjust the loop length later.
- Run the loop down one desk leg and secure it with adhesive clips so it doesn't swing wildly.
Standing Desk Cable Management Products
Some companies sell cable management kits specifically for standing desks. The key feature is a flexible conduit (like a plastic tech chord) that guides cables along the desk leg without pinching. You can find these for about $12-$25 on Amazon. They're not essential — a well-secured service loop works just as well — but they look cleaner.
Watch Out For
- Pinched cables. Make sure no cables run through the moving joints of the desk frame. That cable will get crushed the first time you raise the desk.
- Short monitor cables. If your monitor(s) sit on the desk, their power and video cables need to have enough length for the full height range. Measure before you buy.
- Wireless peripherals. Consider switching to a wireless mouse and keyboard for your standing desk. It eliminates two of the most frustrating cables to manage on a moving setup.
Peripherals Cable Management
Individual devices have their own cable management quirks. Here's how to handle the most common ones.
Monitors
Desktop monitors are the biggest cable hogs on most desks — power, DisplayPort or HDMI, USB-B upstream if they have a built-in hub, and sometimes a separate USB-C cable for charging. That's three or four cables per monitor.
Best approach: Use adhesive cable clips on the back of the monitor stand to bundle the cables together before they drop down. Then bundle them with zip ties into a single run that goes to your cable tray. If your monitor has a cable management channel built into the stand (many do), use it — that's literally what it's there for.
Keyboard and Mouse
Wired keyboards and mice are getting rarer, but they still exist — especially mechanical keyboards where enthusiasts prefer the hard connection. If you're dealing with a wired keyboard and mouse, use a single USB cable to a desk-mounted hub instead of two cables running to your computer. That way you only have one cable to manage, and the hub acts as a quick-disconnect point.
For wireless peripherals, the cable management challenge shifts to charging. A dedicated charging dock (like the Anker USB C Charger Station, about $60) handles all your devices from one spot, with a single power cord. More on that below.
Laptop Charger
If you work from a laptop, the charging cable is the one you plug and unplug most often. Make it easy to reach. Use a cable clip near the front edge of your desk where you can grab it without reaching behind. Or go with a magnetic charging tip (like a MagSafe adapter) so you can disconnect by feel.
Phone Charger
Same principle — you plug and unplug this at least once a day. A short 3-foot cable keeps the desk tidy. Use a cable clip at the edge of your desk to hold the connector up so you can grab it easily. Or go with a wireless charging pad — one less cable to manage, and you just drop your phone on it.
Product Recommendations by Budget
Here are the products I've seen recommended most consistently across forums, subreddits, and review sites. None of these are "we tested them in a lab" picks — this is research aggregation from thousands of user reviews and community discussions.
Zip Tie Assortment
~$5 · Any hardware store or Amazon
You need these. A bag of 100 mixed-size zip ties, including a few releasable ones. This is the foundation of every cable management setup.
VIVO Under-Desk Cable Tray (STEEL, 17-inch)
Budget pick · ~$17 · Amazon
This is the most recommended under-desk cable tray on the internet, and it's easy to see why. Steel construction, 17 x 4.5 inches, screws into the underside of your desk. Holds a power strip plus all your cable slack. Simple, no-nonsense, works with any desk that has an inch of clearance underneath. The mounting bracket keeps it parallel to the desk surface so nothing slides out.
Best for: People who want a single, clean install that they'll never think about again.
Eveo Cable Management Sleeve
Budget pick · ~$13 · Amazon
A zippered fabric sleeve that bundles multiple cables into one clean line. Available in a few lengths (check your run before you buy). The YKK zipper is solid, the fabric is thick enough to hide cable bumps, and it comes with a Velcro strap for the slack end. If you have cables running down your desk leg or along a baseboard, this is the easiest way to make them disappear.
Best for: Visible vertical or horizontal runs where multiple cables travel the same path.
J Channel Cord Cover Raceway (3-Pack)
Budget pick · ~$15 · Amazon
Three 12-inch adhesive-mounted channels with snap-on covers. Use them on walls, baseboards, or the underside of your desk to route cables in a clean, painted-over track. The adhesive is strong enough for most surfaces but might struggle on textured walls — screw mounting is an option if your wall texture is aggressive. Paintable to match your wall color.
Best for: Wall-mounted cable runs, especially near baseboards or behind desks against a wall.
Anker USB C Charger Station (PowerPort 6 or 7-in-1)
Premium pick · ~$60 · Amazon
This isn't strictly a cable management product, but it's one of the best cable management purchases you'll ever make. A single power cord from the charging station to your under-desk power strip replaces the tangle of phone chargers, tablet chargers, earbuds, and watch charging cables that would otherwise crowd your desk. Multiple USB-C and USB-A ports, GaN technology for compact size, and enough power for simultaneous fast charging on multiple devices.
Best for: Anyone with multiple devices to charge — which is almost everyone.
DIY Solutions That Actually Work
You don't have to buy anything to improve your cable situation. These DIY solutions aren't as elegant as store-bought products, but they cost pennies and they work.
Binder Clips
A large binder clip clamps to the edge of your desk and the metal loops give you a perfect place to route cables. Run the cable through the loops (the silver handles) and it's held in place. Bonus: the clip is fully removable and leaves no adhesive residue.
Use these for temporarily routing a charging cable to the edge of your desk, or as a quick fix for cables that keep slipping off the back. A box of 12 large binder clips costs about $4 at any office supply store.
Velcro Strips (Reusable Cable Ties)
Velcro strips — the kind with a single wrap — are better than zip ties for cables you'll need to disconnect and reconnect. Buy a roll of adhesive Velcro tape or a pack of pre-cut Velcro cable ties. Use them to bundle cables that change often (like your laptop charger). A pack of 10 reusable Velcro ties costs about $5.
Toilet Paper or Paper Towel Rolls
Yes, this is ridiculous. But a cardboard tube from a finished toilet paper roll makes a decent cable sleeve for a single cable. Cut a slit down the length of the tube, slide it over the cable, and you've got a rigid sleeve that prevents the cable from kinking under the desk. Not exactly a professional solution, but it works in a pinch and costs zero dollars.
Drawer Organizers as Cable Hubs
If you have a desk drawer, drill a hole in the back (or use an existing cable pass-through) and mount your power strip and charging station inside the drawer. Close the drawer and all cables disappear. This is a surprisingly elegant solution if you have a desk with a shallow utility drawer.
Step-by-Step: Cable Manage a Desk from Scratch
Here's the exact process I'd follow if I were starting from zero — no cable management at all, just a desk with a computer and peripherals plugged in.
Step 1: Unplug Everything
Yes, everything. Pull every cable out of every device and power strip. You'll be able to route everything cleanly from the start instead of working around already-plugged cables. Take a photo of the current mess first if you're worried about remembering where everything goes.
Step 2: Sort and Label
Lay all the cables out on the floor. Group them by device. Label each cable with a piece of masking tape or a small label sticker — "monitor power," "monitor HDMI," "laptop USB-C," "keyboard," etc. This takes five minutes and saves you an hour of frustration later.
While you're at it, ditch any cables that aren't actually in use. Most people have at least two or three orphan cables tangled in their setup — old phone chargers, monitor cables for monitors they don't own anymore, random USB cables of unknown origin. Throw them out or put them in a labeled box for spares.
Step 3: Mount Your Cable Tray (If Using One)
Screw or clamp your under-desk cable tray to the underside of your desk. Position it toward the back so it's not visible from a seated position. If you're not using a tray, skip this and move to Step 4.
Step 4: Place Your Power Strip
Put your power strip in the cable tray (or mount it to the underside of the desk if you don't have a tray). Use adhesive cable mounts to secure it in place. You want the power strip to be accessible but not dangling.
Step 5: Route and Connect Power Cables First
Run the power cables from your monitor(s), computer, desk lamp, and any other device that needs mains power. Route them to the power strip, but leave a short service loop at each device — about 6 inches of slack at the device end so you can move things slightly without pulling cables taut.
Use zip ties or Velcro straps to bundle the power cables together where they run parallel. Don't bundle them so tightly that they can't breathe — heat needs to escape, especially near the power bricks. Leave an inch or two between cables in the bundle.
Step 6: Route Data Cables
Run your video cables (HDMI, DisplayPort), USB cables, Ethernet, and any other data cables. Keep data cables separate from power cables where possible — electrical interference is a real thing, especially with unshielded cables. If they have to cross, make it a 90-degree cross rather than a parallel run.
Use zip ties to bundle data cables together, separate from the power bundle. This makes future troubleshooting easier — you can trace a data cable without untying the power bundle.
Step 7: Bundle and Route to Floor or Wall
Gather all the cables that need to leave the desk area — the main power cord from your power strip to the wall outlet, your Ethernet cable, and any cable that runs to a floor outlet or wall jack. Bundle them into a cable sleeve or zip-tie them together in a single flat bundle that runs down a desk leg or along the wall.
Step 8: Manage the Slack
Excess cable length gets coiled and secured in the cable tray. Use Velcro straps to hold the coils — never use zip ties for this, because you'll want to adjust the coils later. The coils should sit flat in the tray, not piled up in a heap.
Step 9: Manage Peripherals Charging
Place your charging station (or individual chargers) on your desk in a spot that's easy to reach. Use a short 3-foot cable for your phone charger. Route the charging station's power cord to the cable tray so it's the only visible wire on your desk surface.
Step 10: Clip and Secure Visible Runs
Use adhesive cable clips to secure any cables that are visible — the ones running from your monitor to the desk surface, from your keyboard to your computer, etc. Clips at the edge of the desk keep cables from dangling.
Step 11: Test and Adjust
Turn everything on. Make sure all devices are working. If you have a standing desk, run it through the full height range to confirm no cables are too short or getting pinched. Tweak any bundles that are too tight or too loose.
Step 12: Label Your Power Strip
Use a label maker or masking tape to identify what's plugged into each outlet on your power strip. This sounds obsessive, but the first time a device stops working and you can instantly identify which plug to check, you'll be grateful.
Comparison Table
| Product | Price | Type | Best For | Installation | Editor's Choice Zip Ties (assorted) | ~$5 | Bundling | Any cable bundling needs | None — just wrap and pull | Editor's Choice Adhesive Cable Clips (12-pack) | ~$6 | Routing | Securing cables to desk edges | Peel and stick | Best Value VIVO Under-Desk Cable Tray | ~$17 | Tray / Basket | Hiding power strip and slack | Screw-in (drill recommended) | Editor's Choice Eveo Cable Management Sleeve | ~$13 | Sleeve | Bundling visible runs | Wrap and zip | Editor's Choice J Channel Raceway (3-pack) | ~$15 | Raceway | Wall-mounted cable runs | Adhesive or screw | Editor's Choice Anker USB C Charger Station | ~$60 | Charging hub | Reducing charger cable clutter | Place on desk, plug one cord |
|---|
Frequently Asked Questions
A complete cable management setup costs $30-80 for a standard desk. The essentials: under-desk cable tray ($17-25), velcro cable ties ($8-12 for a 50-pack), cable clips ($6-10), and a J-channel raceway ($10-15). If you need extension cords or a new power strip, add $15-25. That's $56-87 total for a setup that will look dramatically cleaner and be easier to maintain.
Velcro ties, every time. Zip ties are permanent—you cut them off whenever you need to add, remove, or reroute a cable. Velcro ties are reusable, adjustable, and let you reconfigure your setup without tools. The only exception is for cables that will never move (in-wall runs, permanent installations). For desk setups, buy a roll of adhesive-backed velcro and cut to length as needed.
This is the trickiest cable management scenario. The key is service loops and cable channels: leave enough slack in each cable to accommodate the full height range of the desk (typically 15-20 inches of movement). Route cables along a cable chain or spiral wrap that moves with the desk. Use a cable tray under the desk to collect excess slack. For the power cord and Ethernet, use a longer cable (8-10 feet) coiled near the base, with velcro keeping it tidy. Monitor arms with built-in cable management are a game-changer here—they keep the cables off the desktop entirely.
Mount it to the underside of the desk using the screw holes on the power strip itself, or use adhesive velcro strips. Position it at the back edge of the desk so the plugged-in cables run toward the wall rather than toward your legs. A mesh cable tray provides a dedicated basket for the power strip and all its connected cables. For a cleaner look, use a slim power strip like the Anker Power Strip with USB-C ($23) that plugs in parallel and doesn't block adjacent outlets.
For a wall-mounted monitor/TV, use an in-wall cable management kit that includes a power bridge and low-voltage cable pass-through. These kits let you route HDMI and power cables inside the wall (check local codes—low-voltage wiring is usually DIY-friendly but electrical work may require a permit). For a simpler solution, use a paintable cable raceway that sticks to the wall surface and conceals cables in a slim channel.
Cable sleeves (braided expandable tubing) are worth it for cables that run together for long distances—like the bundle from your desk to your tower or wall outlet. They create a single unified look rather than individual tied bundles. For the desk surface itself, sleeves are overkill; individual velcro ties are more practical. Sleeves work best for the large vertical runs behind or beside a desk.
Use adhesive cable clips to route cables along the bottom edge of the desk rather than letting them hang freely. Use velcro straps to bundle cables along the desk's crossbar or frame. A cable raceway ($10-15) sticks to the back edge of the desk to conceal the vertical cable drop. Position your power strip horizontally on the underside of the desk so plugs face inward.
The single highest-impact move is mounting your power strip under the desk. It removes 80% of visible cable clutter. That one change eliminates the tangle of wires snaking along your wall, frees up floor space, and makes it easy to unplug and reroute cables when you need to adjust your setup. For $17 (VIVO cable tray) or just velcro strips, it's the best value in cable management.
Bottom Line
Cable management isn't about making your desk look like a sterile tech showroom. It's about safety, focus, and not having a panic attack every time you need to plug something in behind your desk.
Start with the $10 fix. If that's not enough, add a cable tray. If you have visible wall runs, add a raceway. If your charging situation is a mess, get a multi-port charger. Each step makes the next one easier, and by the time you're done, you'll wonder why you put it off for so long.
The perfect cable management setup is the one that works for your specific desk, your specific devices, and your specific tolerance for mess. There's no single right answer — but there's definitely a wrong one, and it's the tangled pile of wires you're tolerating right now.
Get personalized product recommendations based on your body, budget, and work style.
Sources & further reading: National Fire Protection Association electrical fire data; Princeton University Neuroscience Institute — visual clutter and attention research; community discussions on r/Workspaces, r/DeskSetup, and r/CableManagement; and several thousand combined Amazon reviews for the products linked above.